· Astrophotography · 6 min read
File Organization
File organization is a decidedly unsexy topic, but it is an important aspect of the hobby. We all have our own systems, but here’s how I approach it.
Backups
I’ve got a 2 terabyte hard drive in my laptop that holds all of my astrophotography images. If that sounds risky to you, you’re right! Hard drives fail, so having a single point of failure is a bad idea. In the short term, I use Backblaze Personal Backup which provides unlimited backups from a single computer. I have 1.2 terabytes of data backing up regularly and pay $9 per month for one computer. You can pay $9 more for each additional computer backups as needed.
I picked up a Synology DS923+ NAS on Black Friday, so I’ll have a follow up post on that and how it changes my approach outlined here.
Common Directories
I have a few central directories - I prefix them with _ just so they sort to the top.
_processing: This directory holds my temporary processing files. I have this separated out because I exclude it from my Backblaze backups. Each target gets its own subfolder and that’s where I point WBPP during stacking._shared: This directory holds my dark library, bias frames, and flat frames from any sessions in a dated subdirectory (named like2024-12-10). I’ll circle back to how the dark and biases are stored because this is important for some scripting I’m doing._staging: This is where I download my latest sessions for screening and intake. Before moving them into the main library, I’ll make sure to remove any subs with clouds or other serious impurities that won’t stack out.
Target Directories
Each target gets its own folder with each session in a dated subfolder (2024-12-10).
Within each session directory, there is a biases, darkFlats, dark, flats, and lights. Since I use a cooled astro camera, most of these directories are just shortcuts out to the shared libraries. If I shot multiple objects in the same night, the flats folder is a link out to the shared folder.
Streamlining the process
Having a fully populated session directory makes loading targets into Weighted Batch Preprocessing trivially easy. Add all of the directories and hit go. But how can we populate these directories without duplicating darks, biases, dark flats, and potentially flats (if shared across multiple objects)? Enter scripting magic and shortcuts!
Here is the GitHub repository in case code is useful to you. The README file has a lot of detail about naming conventions and locations, so if you want to try the script out, you can head over there. I’ll assume you’ve got the naming all squared away and everything in the place.
What the astro_ccd script does
I run the astro_ccd script in each session directory. This script does a number of things:
- Prompts the user to enter any values that cannot be determined from the files (Camera, Gain, Offset)
- Renames the subdirectories to match the Siril naming convention (i.e.
LIGHTtolights) - this was my initial reason for creating the script because I got sick of manually renaming. - Adds the
_SESSION_YYYY-MM-DDand_FILTER_XYZmetadata to the file name if you don’t include it (I have configured N.I.N.A. to add it) - Creates a shortcut to the appropriate bias file based on Camera, Gain, and Offset
- Creates a shortcut to the appropriate dark(s) based on camera, gain, offset, exposure time, and temperature
- Creates a shortcut to the appropriate dark flats based on camera, gain, offset, and filter (this is used to look up the flat duration) - dark flats are likely not needed, but I’ve got them so I just use them.
- Creates a shortcut to the shared flats (unless the flats directory is local)
The end result is you have a directory that can be added to WBPP and will be fully loaded with all of the calibration frames needed for stacking. WBPP will pick up the filter from the filename by default, but you will need to add the SESSION variable to be detected by WBPP as a grouping mechanism.
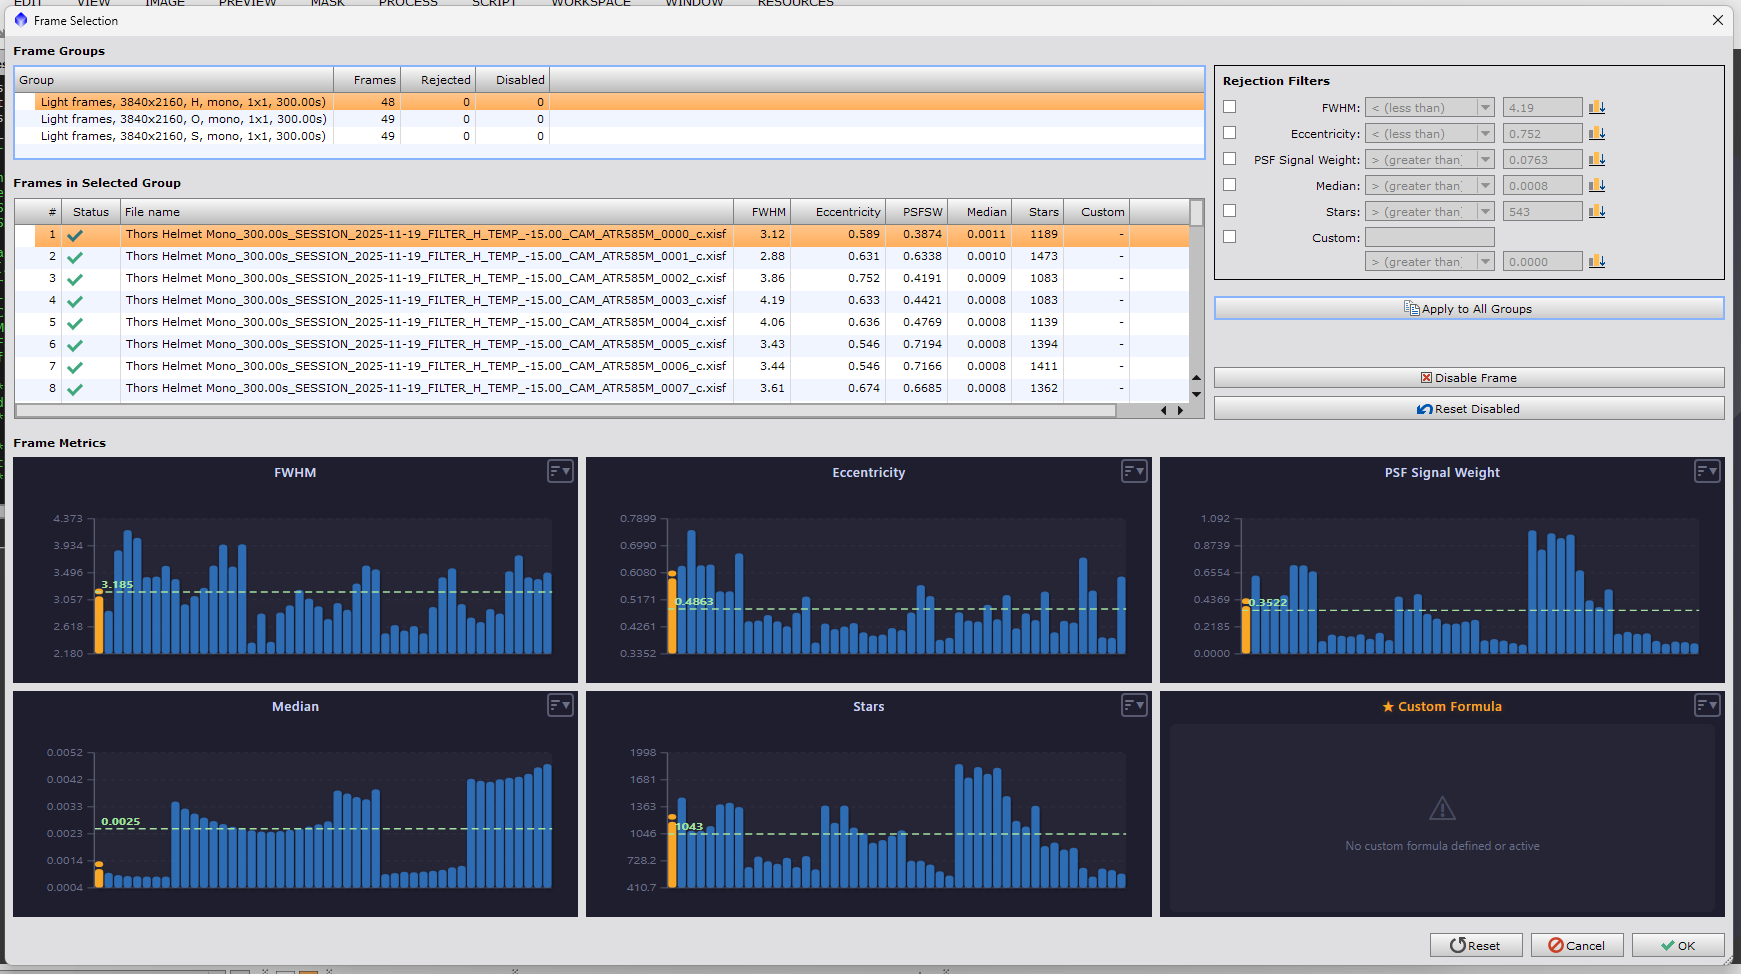
And here it is loaded into WBPP. If everything is done correctly, you will have a green check under the status column. If you click on the light frames from a session, WBPP will highlight the corresponding calibration frames.
And there you have it. Each session will be calibrated with the corresponding flats and darks/biases and then all integrated together to produce a lovely image for you. I hope you found this helpful!
Bonus features
Once I built this system of file organization, I wanted a good way to summarize and track the status of my targets. I built another script in that same code repository called astro_summary - it runs in the top level folder and digs into each subfolder to generate summary data about each target and session. Some information I track:
- Exposure count by filter/exposure time - this is the most important one
- Notes (more on this in a moment)
As a programmer, I chose JSON as the format. Here’s an excerpt from my small dataset on M 51:
  {
    "target": "whirlpool (m51)",
    "notes": "Have some NBZ data stacked that could be mixed in",
    "tags": [
      { "key": "broadband", "value": "" },
      { "key": "published", "value": "2023-02-10" }
    ],
    "hasDataSinceLastPublish": true,
    "summary": [
      { "exposureTime": 180, "filter": "None", "totalCount": 75 },
      { "exposureTime": 300, "filter": "NBZ", "totalCount": 119 }
    ],
    "sessions": [
      {
        "date": "2023-02-10",
        "exposureTime": 180,
        "filter": "None",
        "isDslr": false,
        "sensorTemperature": -25,
        "count": 75
      },
      {
        "date": "2024-02-14",
        "exposureTime": 300,
        "filter": "NBZ",
        "isDslr": false,
        "sensorTemperature": -25,
        "count": 28
      },
      {
        "date": "2024-03-12",
        "exposureTime": 300,
        "filter": "NBZ",
        "isDslr": false,
        "sensorTemperature": -25,
        "count": 24
      },
      {
        "date": "2024-03-18",
        "exposureTime": 300,
        "filter": "NBZ",
        "isDslr": false,
        "sensorTemperature": -25,
        "count": 30
      },
      {
        "date": "2024-04-24",
        "exposureTime": 300,
        "filter": "NBZ",
        "isDslr": false,
        "sensorTemperature": -25,
        "count": 37
      }
    ]
  }
The summary field gets the most usage so I can see if I have sufficient data to process a target, but the notes are very handy especially because I’ve been at this for a few years and have many objects I have imaged. I can write free form notes for my future self, but the tagging system provides a lot of flexibility. By tagging when I published an image, I can populate the hasDataSinceLastPublished field, which can be helpful for finding things I need to process. By tagging broadband vs. narrowband, I can look for targets to image on a given night.
The other problem I solved is providing session information to Astrobin. I found it very tedious to add sessions by hand, so I was very excited when they added the ability to provide a CSV.
I can run astro_summary --target --csv in my target folder to get the output to drop in. Here’s what gets generated for M 51:
date,filter,number,duration,sensorCooling,gain,binning,darks,flats,flatDarks,bortle
2023-02-10,5620,75,180,-25,10,1,25,25,25,5
2024-02-14,5451,28,300,-25,10,1,25,25,25,5
2024-03-12,5451,24,300,-25,10,1,25,25,25,5
2024-03-18,5451,30,300,-25,10,1,25,25,25,5
2024-04-24,5451,37,300,-25,10,1,25,25,25,5
I mapped my filters to their Astrobin ID, so they will properly show up as Optolong L-Quad, IDAS NBZ, etc. So convenient!
Summary
While I like the system I have developed, the most important thing is to develop some sort of organization that suits your needs. This system may evolve as you progress in the hobby, but having a starting point instead of a random pile of subs will help out a lot. Happy imaging and clear skies!